


苍穹外卖1到2

分模块
环境搭建
前端
前端工程基于nginx运行,相当于把前端工程打包到图中的nginx文件夹里面,然后把Nginx目录放在没有中文的目录中,否则不能正常运行。
默认占用80端口,打开任务管理器查看是否有nginx的进程,如果没有那么大概率就是80端口被占用了。
nginx无法启用的解决方案:
**1.先查看80端口是否被占用:**在cmd命令行输入以下代码,像我当时就发现自己的80端口被一个PID为4的东西占用了。
netstat -ano | findstr :80 // 显示所有占用80端口的进程taskkill /F /PID 21108 /PID 28116 /PID 28320 /PID 18436 /PID 6812netsh http show servicestate // 查看http服务状态快照PID为4740的进程,结果找到了一个叫做svchost.eve
2.关闭IIS服务:后面我就上网查找关闭或修改svchost.exe端口的办法,发现一种说法是关闭IIS服务。以管理员身份cmd打开命令行
iisreset /stop // 关闭IIS服务后端
基本配置
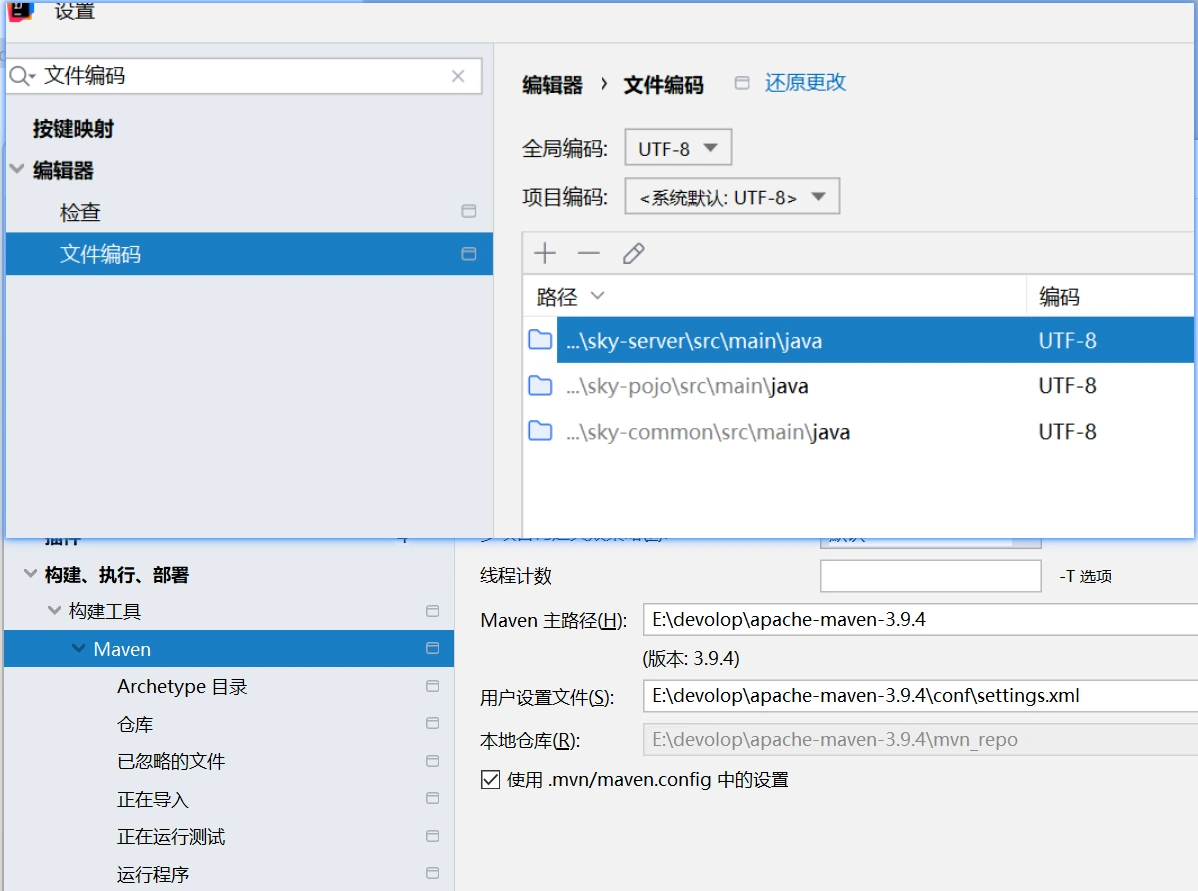
文件编码都配置为UTF-8
配置maven仓库
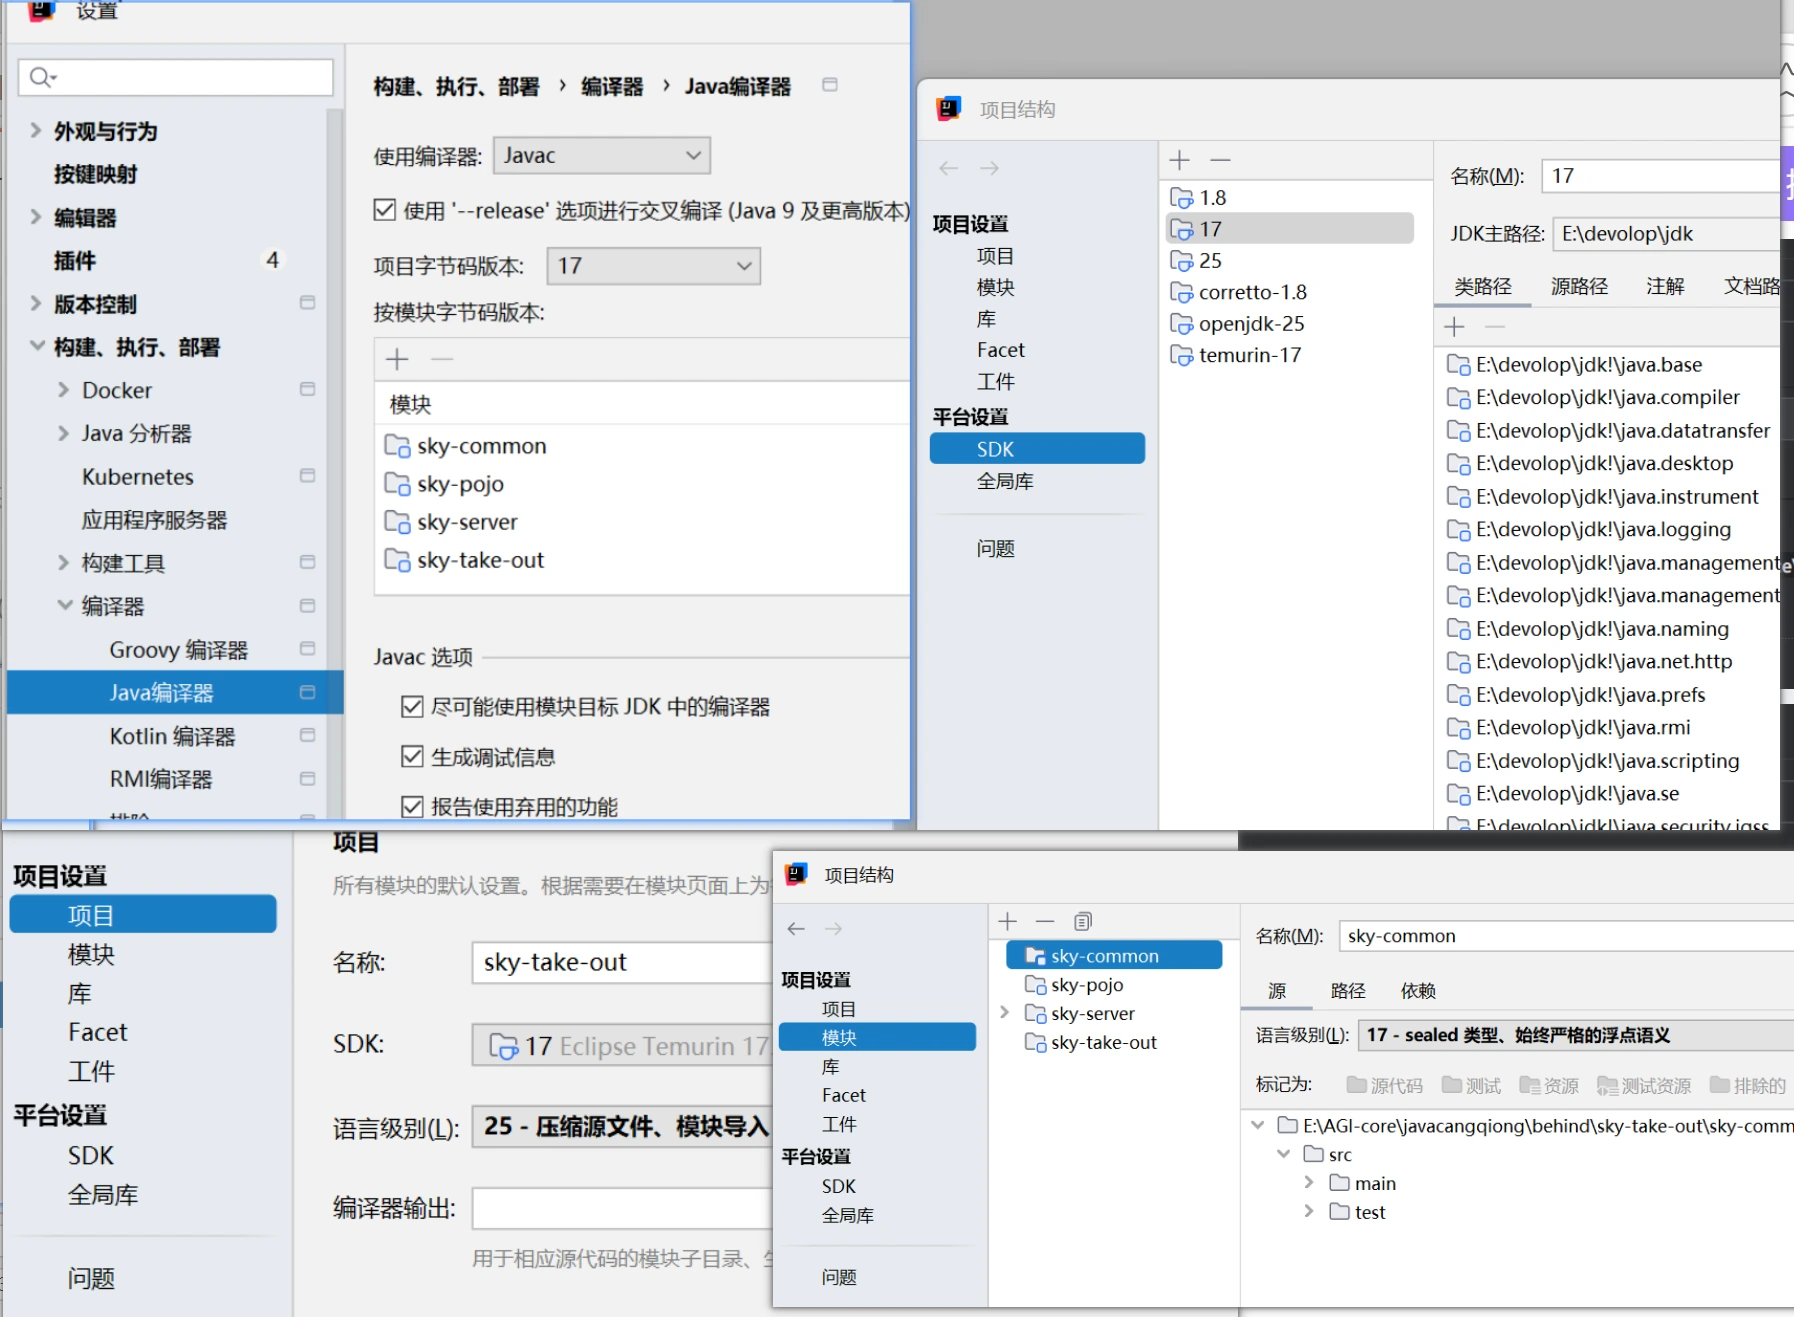
SDK都配置为17
git配置
在.gitignore中配置application-dev.yml文件,表示这个文件不交给Git仓库管理
git config --global user.name "Firebat"# 配置全局邮箱(建议和 GitHub 账号邮箱保持一致)git config --global user.email "firebat@example.com"#生成公钥和私钥ssh-keygen -t ed25519 -C "2860556024@qq.com"#测试连通性ssh -T git@github.comssh -T git@gitee.com#ssh克隆到本地git clone git@github.com:Firebat/zhongwen-shortdrama-context.git# 查看当前 remote 地址git remote -v
# 切换为 SSH 地址git remote set-url origin git@github.com:Firebat/zhongwen-shortdrama-context.gitgit remote set-url origin git@gitee.com:lyf_80/sky-take-out.git# 再次确认git remote -v//切换地址后,下次 push/pull 就会用新地址。不需要重新 clone
#提交git add README.md //git add . 添加到暂存区git commit -m "fix: 修正 README 错别字"git push -u origin main //首次提交加上-ugit push origin mainMysql配置
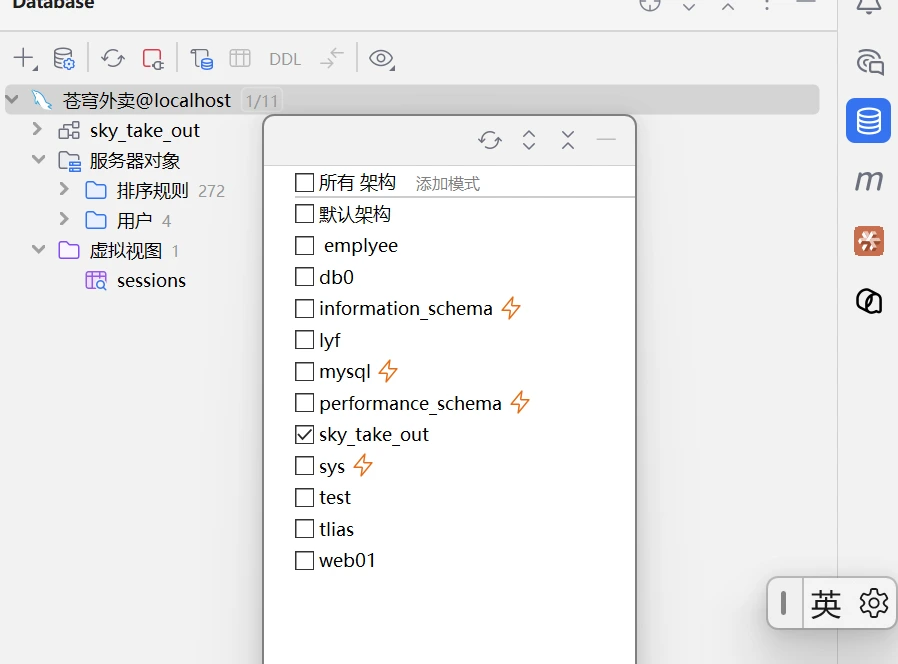
检查application-dev.yml文件的配置密码是否正确
| 序号 | 表名 | 中文名 |
|---|---|---|
| 1 | employee | 员工表 |
| 2 | category | 分类表 |
| 3 | dish | 菜品表 |
| 4 | dish_flavor | 菜品口味表 |
| 5 | setmeal | 套餐表 |
| 6 | setmeal_dish | 套餐菜品关系表 |
| 7 | user | 用户表 |
| 8 | address_book | 地址表 |
| 9 | shopping_cart | 购物车表 |
| 10 | orders | 订单表 |
| 11 | order_detail | 订单明细表 |
联调测试
- 可通过断点调试跟踪项目
- 利用Maven编译生命周期----compile---再进行启动
用户浏览器先访问的是 Nginx,不是直接访问后端服务。
http://localhost:80/api/employee/loginNginx 会根据 location /api/ 这条规则,把请求转发到后端。location /api/ { proxy_pass http://localhost:8080/admin/;}http://localhost:8080/admin/employee/login也就是说,前端看到的是 /api/...,后端实际处理的是 /admin/前端看到的是 /api/...,后端实际处理的是 /admin/
代理”帮你做了路径转换
- 前端只访问一个入口
localhost:80 - 后端真实地址和端口被隐藏
- 可以把前端请求统一改写成后端需要的路径
- 后期后端地址改了,只改 Nginx 配置,不用改前端代码
两个location
反向代理:浏览器只访问 Nginx,Nginx 替后端接请求
路径映射:把 /api/、/user/ 改写成后端能识别的路径
负载均衡:后端不是一台,而是一组,Nginx 负责分发请求
登录功能
Mapper
@Mapperpublic interface EmployeeMapper {
/** * 根据用户名查询员工 * @param username /
@Select("select * from employee where username = #{username}") Employee getByUsername(String username);
}实体类
@Data@ApiModel(description = "员工登录时传递的数据模型")public class EmployeeLoginDTO implements Serializable {
@ApiModelProperty("用户名") private String username;
@ApiModelProperty("密码") private String password;
}Service
@Servicepublic class EmployeeServiceImpl implements EmployeeService {
@Autowired private EmployeeMapper employeeMapper;
/** * 员工登录 * * @param employeeLoginDTO * @return */ public Employee login(EmployeeLoginDTO employeeLoginDTO) { String username = employeeLoginDTO.getUsername(); String password = employeeLoginDTO.getPassword();
//1、根据用户名查询数据库中的数据 Employee employee = employeeMapper.getByUsername(username);
//2、处理各种异常情况(用户名不存在、密码不对、账号被锁定) if (employee == null) { //账号不存在//抛出异常类 throw new AccountNotFoundException(MessageConstant.ACCOUNT_NOT_FOUND); }
//密码比对 // TODO 后期需要进行md5加密,然后再进行比对 if (!password.equals(employee.getPassword())) { //密码错误 throw new PasswordErrorException(MessageConstant.PASSWORD_ERROR); }
if (employee.getStatus() == StatusConstant.DISABLE) { //账号被锁定 throw new AccountLockedException(MessageConstant.ACCOUNT_LOCKED); }
//3、返回实体对象 return employee; }
}/** * 账号不存在异常 */public class AccountNotFoundException extends BaseException {
public AccountNotFoundException() { }
public AccountNotFoundException(String msg) { super(msg); }
}/** * 业务异常 */public class BaseException extends RuntimeException {
public BaseException() { }
public BaseException(String msg) { super(msg); }
}
/** * 全局异常处理器,处理项目中抛出的业务异常 */@RestControllerAdvice@Slf4jpublic class GlobalExceptionHandler {
/** * 捕获业务异常 * @param ex * @return */ @ExceptionHandler public Result exceptionHandler(BaseException ex){ log.error("异常信息:{}", ex.getMessage()); return Result.error(ex.getMessage()); }
}Controller
- 利用JwtUtil和@@ConfigurationProperties(prefix = “sky.jwt”)引入配置类设置密钥和过期时间生成token
- 封装数据利用@builder注解
/** * 员工管理 */@RestController@RequestMapping("/admin/employee")@Slf4jpublic class EmployeeController {
@Autowired private EmployeeService employeeService; @Autowired private JwtProperties jwtProperties;//把信息设置为配置属性类
/** * 登录 * * @param employeeLoginDTO * @return */ @PostMapping("/login") public Result<EmployeeLoginVO> login(@RequestBody EmployeeLoginDTO employeeLoginDTO) { log.info("员工登录:{}", employeeLoginDTO);
Employee employee = employeeService.login(employeeLoginDTO);
//登录成功后,生成jwt令牌 Map<String, Object> claims = new HashMap<>(); claims.put(JwtClaimsConstant.EMP_ID, employee.getId()); String token = JwtUtil.createJWT( jwtProperties.getAdminSecretKey(), jwtProperties.getAdminTtl(), claims);//封装数据 EmployeeLoginVO employeeLoginVO = EmployeeLoginVO.builder() .id(employee.getId()) .userName(employee.getUsername()) .name(employee.getName()) .token(token) .build();
return Result.success(employeeLoginVO); }
/** * 退出 * * @return */ @PostMapping("/logout") public Result<String> logout() { return Result.success(); }
}生成jwt令牌
- @ConfigurationProperties(prefix = “sky.jwt”)定义配置属性类
- predix对应yml文件自定义设置
@Component@ConfigurationProperties(prefix = "sky.jwt")@Datapublic class JwtProperties {
/** * 管理端员工生成jwt令牌相关配置 */ private String adminSecretKey; private long adminTtl; private String adminTokenName;
/** * 用户端微信用户生成jwt令牌相关配置 */ private String userSecretKey; private long userTtl; private String userTokenName;
}
//yml文件sky: jwt: # 设置jwt签名加密时使用的秘钥 admin-secret-key: itcast # 设置jwt过期时间 admin-ttl: 7200000 # 设置前端传递过来的令牌名称 admin-token-name: token封装数据
@Data@Builder@NoArgsConstructor@AllArgsConstructor@ApiModel(description = "员工登录返回的数据格式")public class EmployeeLoginVO implements Serializable {
@ApiModelProperty("主键值") private Long id;
@ApiModelProperty("用户名") private String userName;
@ApiModelProperty("姓名") private String name;
@ApiModelProperty("jwt令牌") private String token;
}优化
password = DigestUtils.md5DigestAsHex(password.getBytes()); if (!password.equals(employee.getPassword())) { //密码错误 throw new PasswordErrorException(MessageConstant.PASSWORD_ERROR); }Swagger
引入依赖
<dependency> <groupId>com.github.xiaoymin</groupId> <artifactId>knife4j-spring-boot-starter</artifactId></dependency> /** * 通过knife4j生成接口文档 * @return */ @Bean public Docket docket() { ApiInfo apiInfo = new ApiInfoBuilder() .title("苍穹外卖项目接口文档") .version("2.0") .description("苍穹外卖项目接口文档") .build(); Docket docket = new Docket(DocumentationType.SWAGGER_2) .apiInfo(apiInfo) .select()
//扫描组件 .apis(RequestHandlerSelectors.basePackage("com.sky.controller")) .paths(PathSelectors.any()) .build(); return docket; } /** * 设置静态资源映射 * @param registry */ protected void addResourceHandlers(ResourceHandlerRegistry registry) { registry.addResourceHandler("/doc.html").addResourceLocations("classpath:/META-INF/resources/"); registry.addResourceHandler("/webjars/**").addResourceLocations("classpath:/META-INF/resources/webjars/"); }| 注解 | 说明 |
|---|---|
| @Api | 用在类上,例如Controller,表示对类的说明 |
| @ApiModel | 用在类上,例如entity、DTO、VO |
| @ApiModelProperty | 用在属性上,描述属性信息 |
| @ApiOperation | 用在方法上,例如Controller的方法,说明方法的用途、作用 |
员工管理
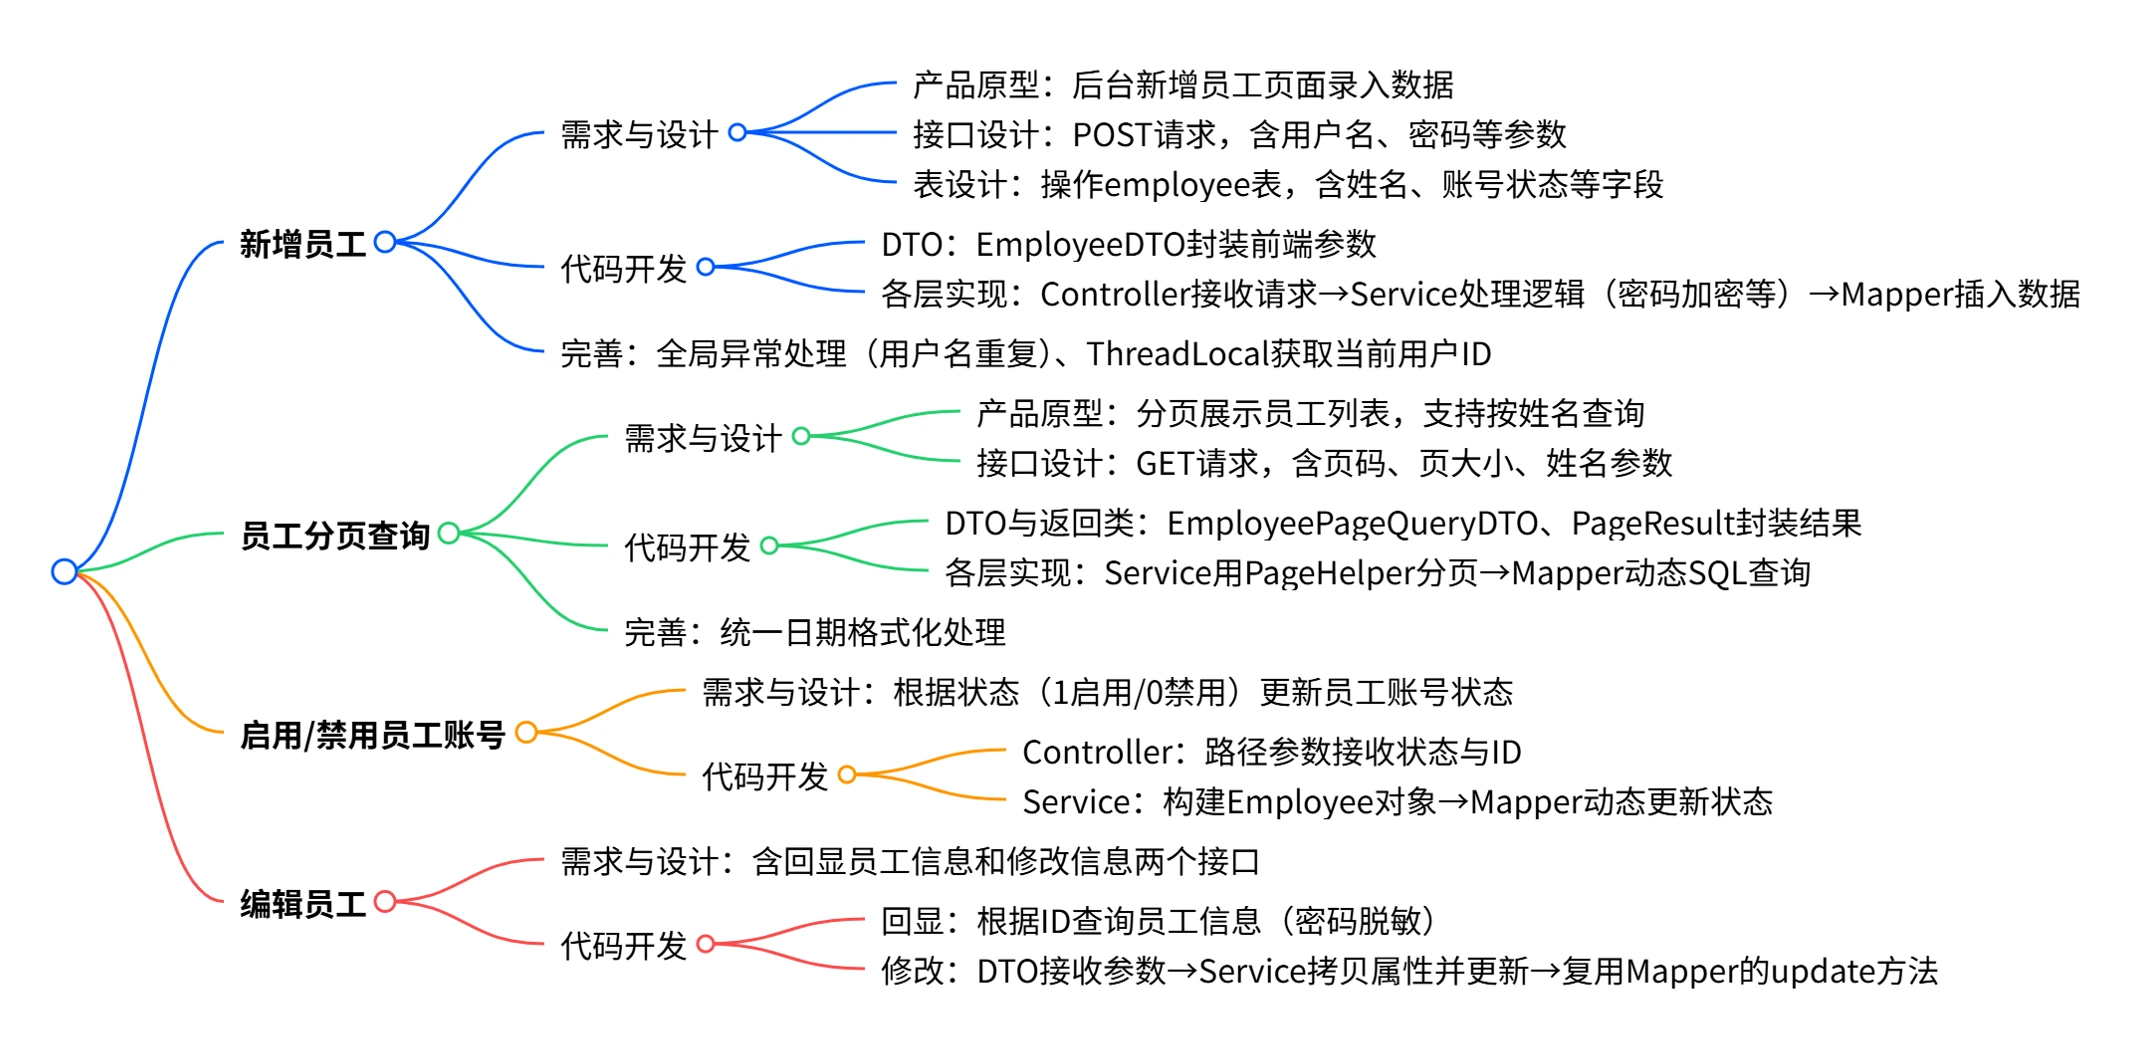
新增员工
-
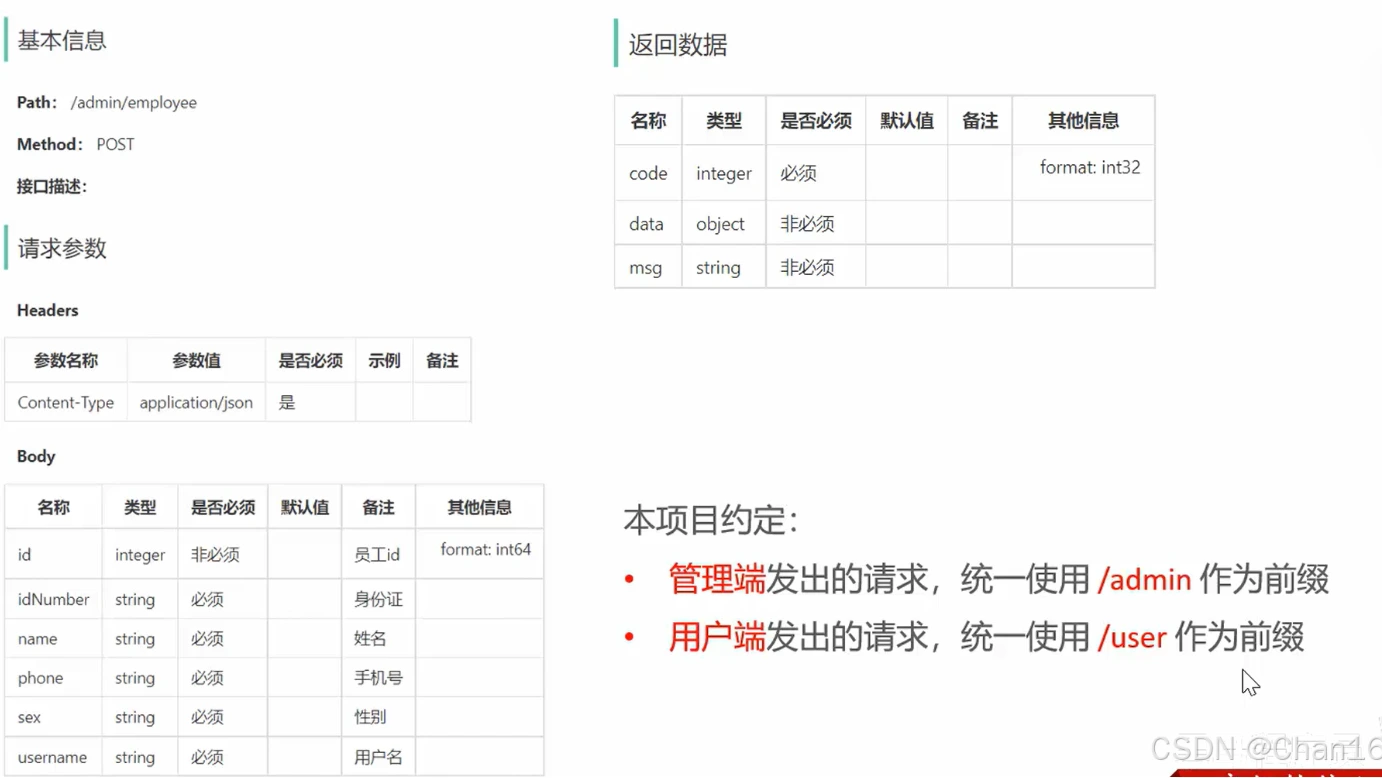
客户端可以解析返回的 JSON 数据,根据 code 判断请求是否成功,并根据 data 和 msg 获取具体的业务数据或错误信息。
-
请求参数:有个Body,确定请求参数为json格式,需要加RequestBody。请求的数据封装在EmployeeDTO,符合所给数据。
-
返回数据:统一Result,新增操作没有返回data,就返回Result.success()即可。
-
当前端提交的数据和实体类中对应的属性差别比较大时,建议使用DTO来封装数据
实体类
@Data@Builder@NoArgsConstructor@AllArgsConstructorpublic class Employee implements Serializable {
private static final long serialVersionUID = 1L;
private Long id;
private String username;
private String name;
private String password;
private String phone;
private String sex;
private String idNumber;
private Integer status;
//@JsonFormat(pattern = "yyyy-MM-dd HH:mm:ss") private LocalDateTime createTime;
//@JsonFormat(pattern = "yyyy-MM-dd HH:mm:ss") private LocalDateTime updateTime;
private Long createUser;
private Long updateUser;
}DTO
@Datapublic class EmployeeDTO implements Serializable {
private Long id;
private String username;
private String name;
private String phone;
private String sex;
private String idNumber;
}Controller
前端请求路径为admin/employee,但前面@RequestMapping("/admin/emplyee") @slf4j开启记录日志功能 @RestController=@controller+ //新增员工 @APIOperation("新增员工") @PostMapping public Result save(@RequestBody EmployeeDTO dto){ log.info("新增员工,员工数据:{}",dto); //新增完后不需要进行其他操作 employeeService.add(dto); return Result.success(); }Service
/** * 新增员工 * * @param employeeDTO */ public void save(EmployeeDTO employeeDTO) { Employee employee = new Employee(); //对象属性拷贝 BeanUtils.copyProperties(employeeDTO, employee);
//设置employeeDTO没有的属性 //设置账号的状态,默认正常状态 1表示正常 0表示锁定 employee.setStatus(StatusConstant.ENABLE); //设置密码,默认密码123456 employee.setPassword(DigestUtils.md5DigestAsHex(PasswordConstant.DEFAULT_PASSWORD.getBytes())); //设置当前记录的创建时间和修改时间 employee.setCreateTime(LocalDateTime.now()); employee.setUpdateTime(LocalDateTime.now()); //设置当前记录创建人id和修改人id employee.setCreateUser(10L);//目前写个假数据,后期修改 employee.setUpdateUser(10L); employeeMapper.insert(employee);//后续步骤定义 }/** * 状态常量,启用或者禁用 */public class StatusConstant { //启用 public static final Integer ENABLE = 1; //禁用 public static final Integer DISABLE = 0;}/** * 密码常量 */public class PasswordConstant {
public static final String DEFAULT_PASSWORD = "123456";
}-
EmployeeDTO能够传递的数据有限,所以新建一个Employee实体类补充未传递的属性。
-
BeanUtils的copyProperties方法可以用于复制某个对象的属性到另一个对象上。
-
在设置密码时要对密码进行MD5加密,使用DigestUtils的md5DigestAsHex方法,里面传参原字符串密码的byte数组,可以用getBytes()方法,
-
业务要求新增员工默认密码为123456,如果直接在参数内写123456往往别人看代码的时候就不知道它的意思,
-
使用自定义的PasswordConstant类,包括下面的状态默认设置为启用,也是使用自定义的StatusConstant类
Mapper
@Insert("insert into employee (name, username, password, phone, sex, id_number, create_time, update_time, create_user, update_user,status) " + "values " + "(#{name},#{username},#{password},#{phone},#{sex},#{idNumber},#{createTime},#{updateTime},#{createUser},#{updateUser},#{status})") void insert(Employee employee);mybatis: configuration: #开启驼峰命名 map-underscore-to-camel-case: true //实体类和数据库进行自动转换 数据库id_number->实体类idNumber问题
录入的用户名已存在,抛出异常后没有处理
employee表中设置了username唯一的限制,
新增时当前设置的username已经存在就会报SQL异常
全局异常处理中进行捕获SQL异常,通常就是抛出一个XXX已存在!
恰好这个重复的username在抛出的异常里面正好存在,利用split方法取到这个username然后加上自定义常量,返回给前端这个Result.error,然后再显示再页面。其他的异常就可以报一个自定义未知异常常量。
@ExceptionHandler public Result exceptionHandler(SQLIntegrityConstraintViolationException ex){ //Duplicate entry 'zhangsan' for key 'employee.idx_username' String message = ex.getMessage(); if(message.contains("Duplicate entry")){ //以空格作为分割,当成字符串数组 String[] split = message.split(" "); String username = split[2]; String msg = username + MessageConstant.ALREADY_EXISTS; return Result.error(msg); }else{ return Result.error(MessageConstant.UNKNOWN_ERROR); }//MessageConstant是一个异常常量池//public static final String ALREADY_EXISTS = "已存在";//public static final String UNKNOWN_ERROR = "未知错误";- 新增员工时,创建人id和修改人id设置为了固定值
- jwt拦截器
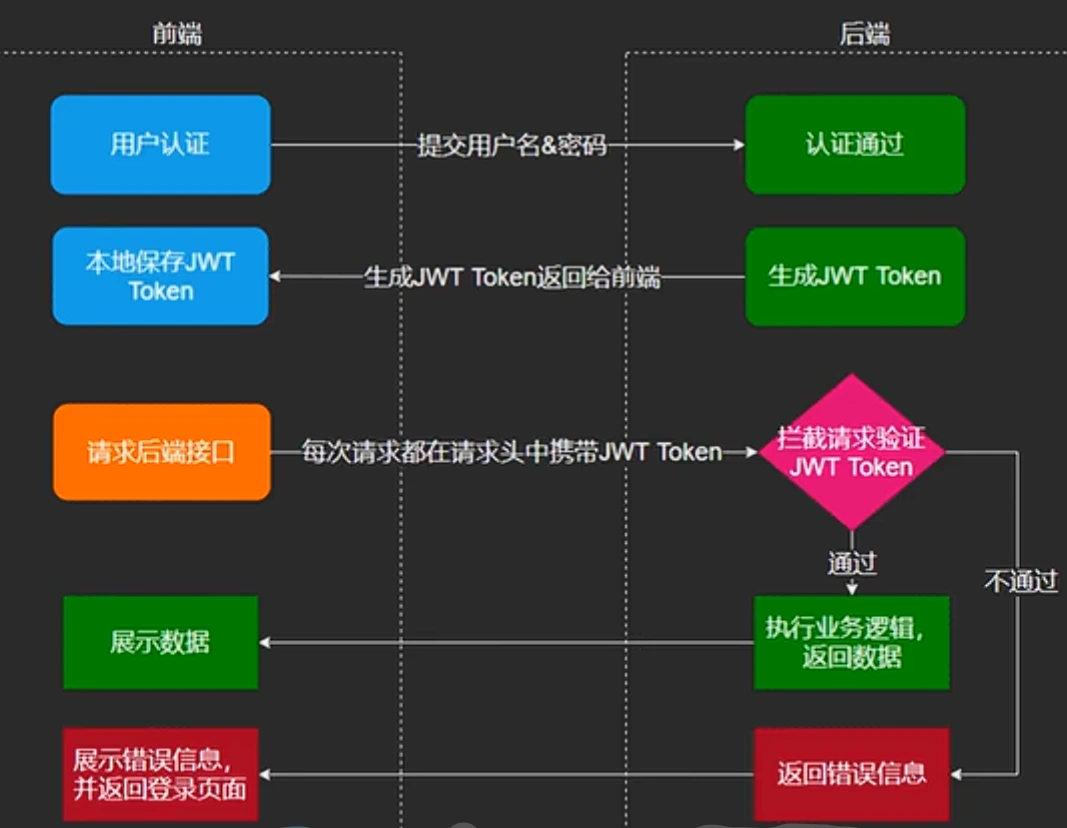
/** * jwt令牌校验的拦截器 */@Component@Slf4jpublic class JwtTokenAdminInterceptor implements HandlerInterceptor {
@Autowired private JwtProperties jwtProperties;
public boolean preHandle(HttpServletRequest request, HttpServletResponse response, Object handler) throws Exception { //判断当前拦截到的是Controller的方法还是其他资源 if (!(handler instanceof HandlerMethod)) { //当前拦截到的不是动态方法,直接放行 return true; }
//1、从请求头中获取令牌 String token = request.getHeader(jwtProperties.getAdminTokenName());
//2、校验令牌 try { log.info("jwt校验:{}", token); Claims claims = JwtUtil.parseJWT(jwtProperties.getAdminSecretKey(), token); Long empId = Long.valueOf(claims.get(JwtClaimsConstant.EMP_ID).toString()); log.info("当前员工id:", empId); /////将用户id存储到ThreadLocal//////// BaseContext.setCurrentId(empId) //3、通过,放行 return true; } catch (Exception ex) { //4、不通过,响应401状态码 response.setStatus(401); return false; } }}/** * 配置类,注册web层相关组件 */@Configuration@Slf4jpublic class WebMvcConfiguration extends WebMvcConfigurationSupport {
@Autowired private JwtTokenAdminInterceptor jwtTokenAdminInterceptor;
/** * 注册自定义拦截器 * * @param registry */ protected void addInterceptors(InterceptorRegistry registry) { log.info("开始注册自定义拦截器..."); registry.addInterceptor(jwtTokenAdminInterceptor) .addPathPatterns("/admin/**") .excludePathPatterns("/admin/employee/login"); }ThreadLocal
ThreadLocal 并不是一个Thread,而是Thread的局部变量。 ThreadLocal为每个线程提供单独一份存储空间,具有线程隔离的效果,只有在线程内才能获取到对应的值,线程外则不能访问。
方法 作用 public void set (T value) 设置当前线程的线程局部变量的值 public T get() 返回当前线程所对应的线程局部变量的值 public void remove() 移除当前线程的线程局部变量
package com.sky.context;
public class BaseContext {
public static ThreadLocal<Long> threadLocal = new ThreadLocal<>();
public static void setCurrentId(Long id) { threadLocal.set(id); }
public static Long getCurrentId() { return threadLocal.get(); }
public static void removeCurrentId() { threadLocal.remove(); }
}-
在设置创建人设更新人的时候思路是在哪个账号进行新增操作就取到这个账号的ID进行设置即可。
-
ThreadLocal进行处理取到ID,它提供了一种线程级别的数据存储机制,主要用于解决并发问题和在线程中传递数据。该账号的处理过程就在一个线程中。
-
在最开始登录发放校验token令牌的时候我们获取到了该账号的ID。将ID存入ThreadLocal中,
-
然后等到该账户进行新增操作设置创建人更新人的时候再把ID从ThreadLocal中取出。自定义BaseContext工具类,里面存放一个ThreadLocal,存入数据调用setCurrentId方法,取出时调用getCurrentId方法。
设置时间操作如果不做其他处理就会导致管理端页面显示的数据可读性差。
配置类继承WebMvcConfigurationSupport,它的默认消息转换器导致了响应到页面的LocalDateTime数据是一个数组。
解决方案是扩展消息转换器对象。以下的操作比较固定,
自定义的消息对象转换器只需要读懂它是通过序列化和反序列化技术使得最后响应的LocalDateTime规范化即可。扩展消息转换器对象需要明确三步操作:
(1)创建消息转换器对象MappingJackson2HttpMessageConverter
(2)然后往新创建的消息转换器对象上设置自定义的消息对象转换器JacksonObjectMapper
(3)将自定义的消息对象转换器加入到参数converters这个集合(里面是一堆消息对象转换器)内部并设置为优先级最高
/** * 对象映射器:基于 jackson 将 Java 对象转为 json,或者将 json 转为 Java 对象 * 将 JSON 解析为 Java 对象的过程称为【从 JSON 反序列化 Java 对象】 * 从 Java 对象生成 JSON 的过程称为【序列化 Java 对象到 JSON】 */public class JacksonObjectMapper extends ObjectMapper {
public static final String DEFAULT_DATE_FORMAT = "yyyy-MM-dd"; //public static final String DEFAULT_DATE_TIME_FORMAT = "yyyy-MM-dd HH:mm:ss"; public static final String DEFAULT_DATE_TIME_FORMAT = "yyyy-MM-dd HH:mm"; public static final String DEFAULT_TIME_FORMAT = "HH:mm:ss";
public JacksonObjectMapper() { super();
// 收到未知属性时不报异常 this.configure(FAIL_ON_UNKNOWN_PROPERTIES, false);
// 反序列化时,属性不存在的兼容处理 this.getDeserializationConfig().withoutFeatures( DeserializationFeature.FAIL_ON_UNKNOWN_PROPERTIES );
SimpleModule simpleModule = new SimpleModule() .addDeserializer( LocalDateTime.class, new LocalDateTimeDeserializer( DateTimeFormatter.ofPattern(DEFAULT_DATE_TIME_FORMAT) ) ) .addDeserializer( LocalDate.class, new LocalDateDeserializer( DateTimeFormatter.ofPattern(DEFAULT_DATE_FORMAT) ) ) .addDeserializer( LocalTime.class, new LocalTimeDeserializer( DateTimeFormatter.ofPattern(DEFAULT_TIME_FORMAT) ) ) .addSerializer( LocalDateTime.class, new LocalDateTimeSerializer( DateTimeFormatter.ofPattern(DEFAULT_DATE_TIME_FORMAT) ) ) .addSerializer( LocalDate.class, new LocalDateSerializer( DateTimeFormatter.ofPattern(DEFAULT_DATE_FORMAT) ) ) .addSerializer( LocalTime.class, new LocalTimeSerializer( DateTimeFormatter.ofPattern(DEFAULT_TIME_FORMAT) ) );
// 注册功能模块,例如,可以添加自定义序列化器和反序列化器 this.registerModule(simpleModule); }}/** * 扩展消息转换器对象 * @param converters */@Overrideprotected void extendMessageConverters(List<HttpMessageConverter<?>> converters) { log.info("扩展消息转换器对象...");
// 创建消息转换器对象 MappingJackson2HttpMessageConverter converter = new MappingJackson2HttpMessageConverter();
// 设置自定义的消息对象转换器 converter.setObjectMapper(new JacksonObjectMapper());
// 将自定义的消息对象转换器设置为优先级最高 converters.add(0, converter);}分页查询
Controller
/** * 封装分页查询结果 */@Data@AllArgsConstructor@NoArgsConstructorpublic class PageResult implements Serializable { private long total; //总记录数
private List records; //当前页数据集合}@Datapublic class EmployeePageQueryDTO implements Serializable { //员工姓名 private String name;
//页码 private int page;
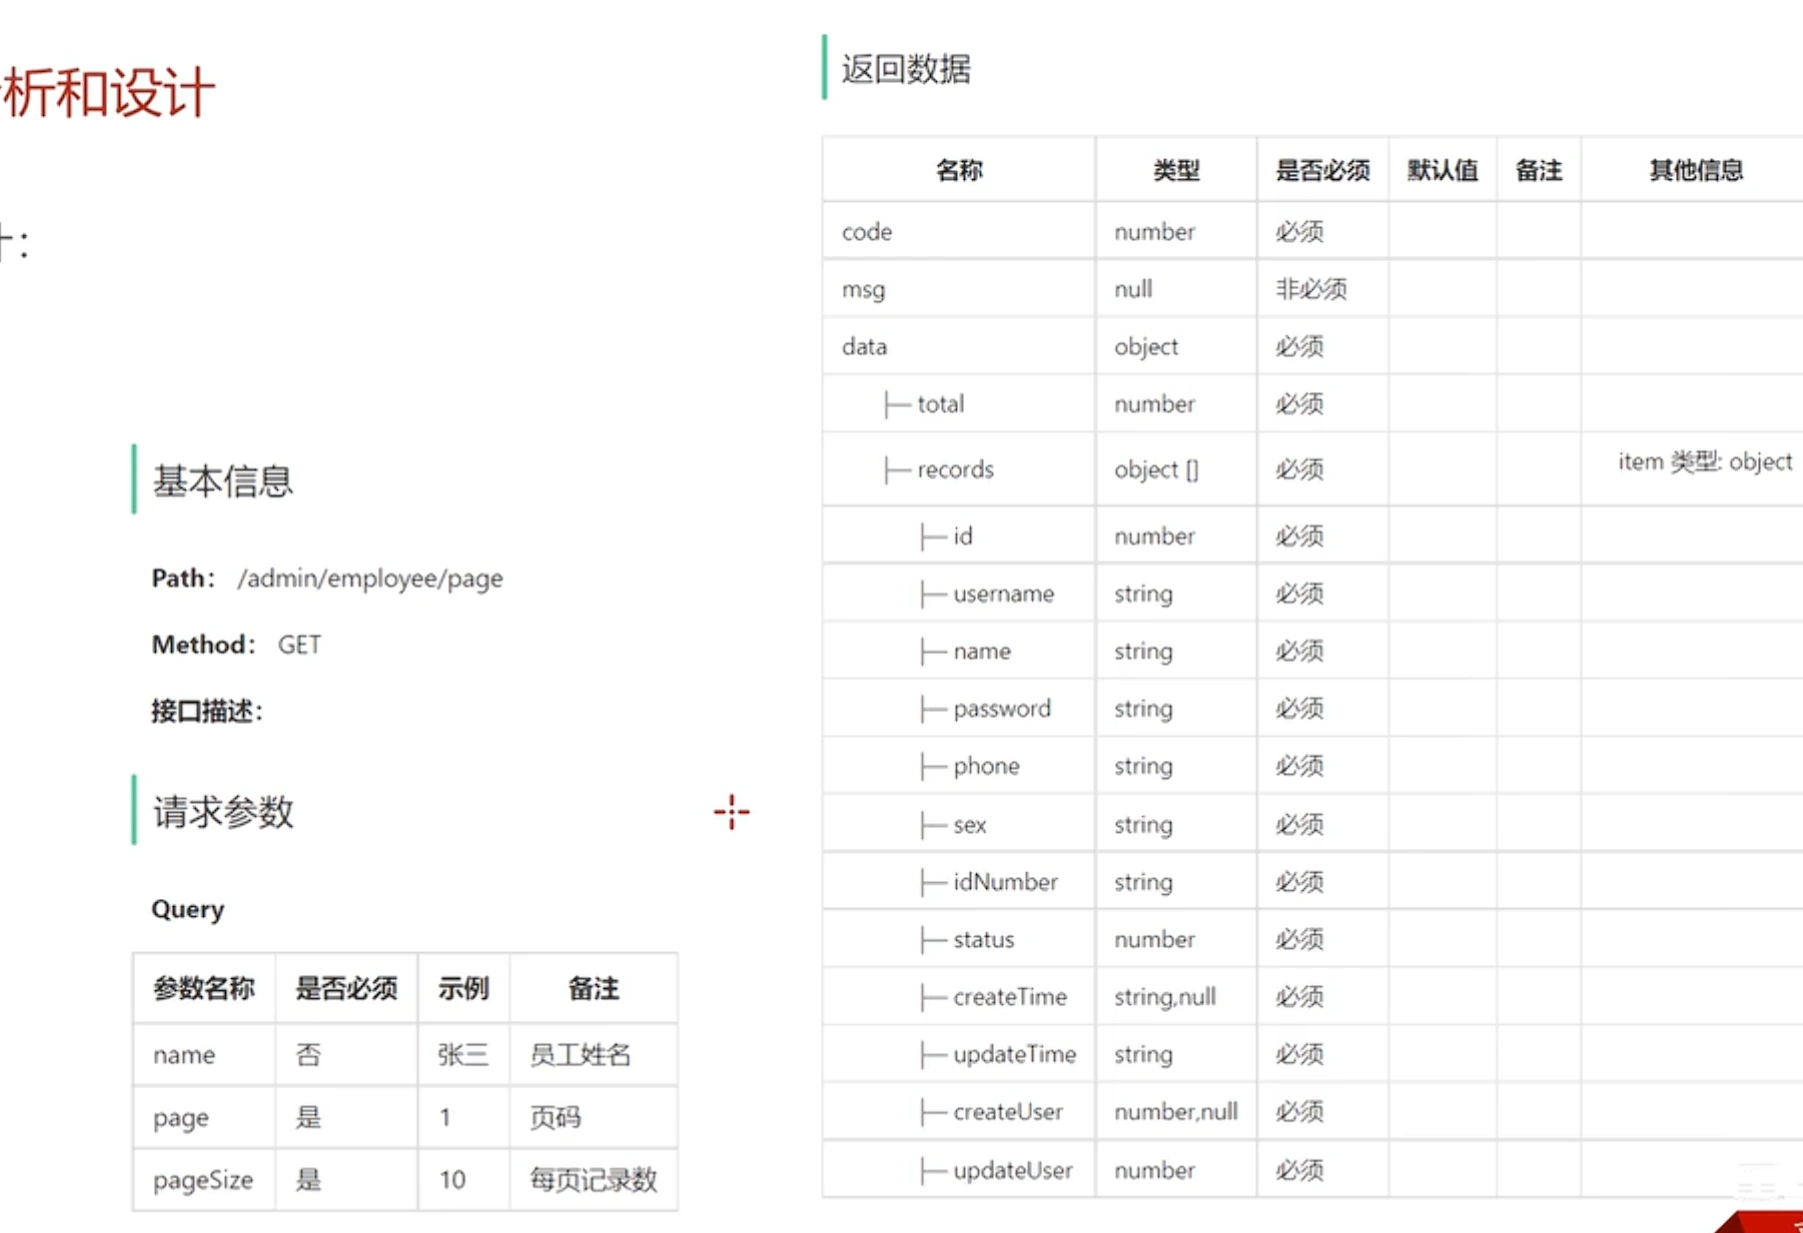
//每页显示记录数 private int pageSize;}//分页查询 @ApiOperation("分页查询") @GetMapping("/page") public Result<PageResult> page(EmployeePageQueryDTO query){ log.info("分页查询,参数:{}",query); PageResult pageResult = employeeService.page(query); return Result.success(pageResult); }-
PageResult为每位员工信息的集合
-
EmployeePageQueryDTO为查询参数,姓名,页码,每页记录数
-
请求参数用专门定义的分页查询DTO封装,里面正好有page、pageSize字段
-
name则是按照员工姓名模糊查询,type是分类模块里面按照类型分页查询本模块用不到。
-
调用service接口传入dto参数。service中page
获取总页数和数据列表返回结果PgaeRsult,封装在pageResult里面,作为data作为Result.success()的参数。
Service
//分页查询 @Override public PageResult page(EmployeePageQueryDTO query) { PageHelper.startPage(query.getPage(),query.getPageSize()); Page<Employee> Page = employeeMapper.list(query); return new PageResult(Page.getTotal(),Page.getResult());
}-
设置分页参数,PageHelper的startPage方法设置页码和每页显示记录数,分页插件会自动在Mapper层的SQL语句中自动加入limit语句进行分页操作。
-
调用mapper接口,传入员工姓名,如果有姓名参数就模糊查询,没有就不用,引出后面Mapper层的SQL语句是动态的,需要在xml文件里面编写,最终返回分页插件专门提供的Page类于继承ArrayList可以看作一个集合,里面存储的就是查询到的Employee。
-
返回new出来的PageResult类,利用page的getTotal方法和getResult方法传入总记录数和当前页数据集合
Mapper
mybatis: #mapper配置文件 //使得文件可以被扫描 mapper-locations: classpath:mapper/*.xml type-aliases-package: com.sky.entity configuration: #开启驼峰命名 map-underscore-to-camel-case: true<?xml version="1.0" encoding="UTF-8" ?><!DOCTYPE mapper PUBLIC "-//mybatis.org//DTD Mapper 3.0//EN" "http://mybatis.org/dtd/mybatis-3-mapper.dtd" ><mapper namespace="com.sky.mapper.EmployeeMapper"> <select id="list" resultType="com.sky.entity.Employee"> select * from employee <where> <if test="name != null and name != ''"> and name like concat('%',#{name},'%') </if> </where> order by create_time desc
</select></mapper>在WebMvcConfiguration中扩展SpringMVC的消息转换器,统一对日期类型进行格式处理
/** * 扩展Spring MVC框架的消息转化器 * @param converters */ protected void extendMessageConverters(List<HttpMessageConverter<?>> converters) { log.info("扩展消息转换器..."); //创建一个消息转换器对象 MappingJackson2HttpMessageConverter converter = new MappingJackson2HttpMessageConverter(); //需要为消息转换器设置一个对象转换器,对象转换器可以将Java对象序列化为json数据 converter.setObjectMapper(new JacksonObjectMapper()); //将自己的消息转化器加入容器中 converters.add(0,converter); }启用禁用账号
-
.基本信息:确定Path,在整个Controller层的RequestMapping基础上多加/status/{status},请求方式为PostMapping
-
请求参数:一个路径参数status,前面要加@PathVariable,然后一个Long型的id
-
返回数据:统一Result,因为是更新status操作,所以没有返回值data。
Controller
//启用禁用账号 @ApiOperation("禁用和启用员工账号") @PostMapping("/status/{status}") //路径参数需要@PathVariable public Result startOrStop(@PathVariable Integer status,Long id){ log.info("员工状态修改:{}",id); employeeService.startOrStop(status,id); return Result.success(); }本质上就是个按照所给id更新该员工的status的操作
Service
//启用和禁用账号 @Override public void startOrStop(Integer status, Long id) { //Employee实体类中有@Builder注解,所以可以直接使用builder()方法 //将参数封装成对象 Employee employee =Employee.builder() .id(id) .status(status) .build();
EmployeeMapper.update(employee) }- 链式编程,Employee类上加了@Builder
- 创建employee类主要就是补充属性的作用,像updateTime和updateUser请求参数里面没有传就需要自己取来存到实体类传递,
- 调用下mapper接口完事,传参employee。
Mapper
<update id="update" parameterType="Employee"> <--parameterType="Employee可以这样写是因为type-aliases-package: com.sky.entity--> update employee <set> <if test="name != null">name = #{name},</if> <if test="username != null">username = #{username},</if> <if test="password != null">password = #{password},</if> <if test="phone != null">phone = #{phone},</if> <if test="sex != null">sex = #{sex},</if> <if test="idNumber != null">id_number = #{idNumber},</if> <if test="updateTime != null">update_time = #{updateTime},</if> <if test="updateUser != null">update_user = #{updateUser},</if> <if test="status != null">status = #{status},</if> </set> where id = #{id} </update>编辑员工
Controller
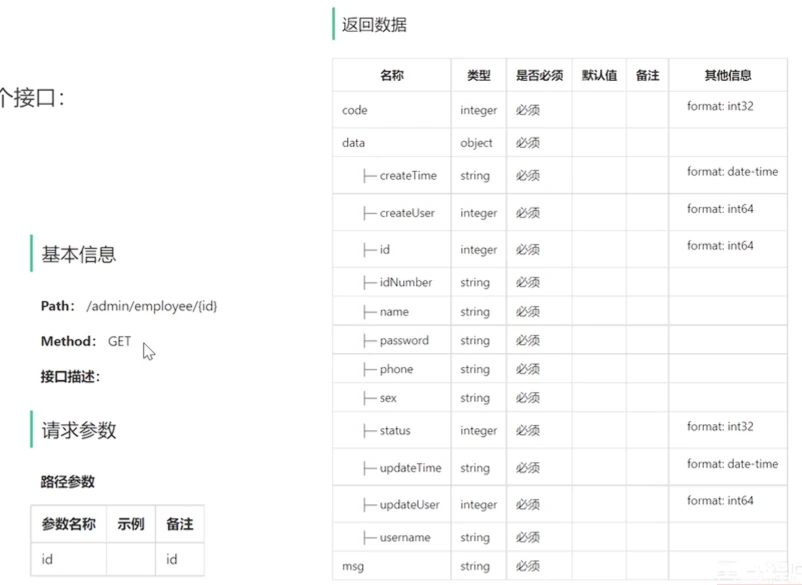
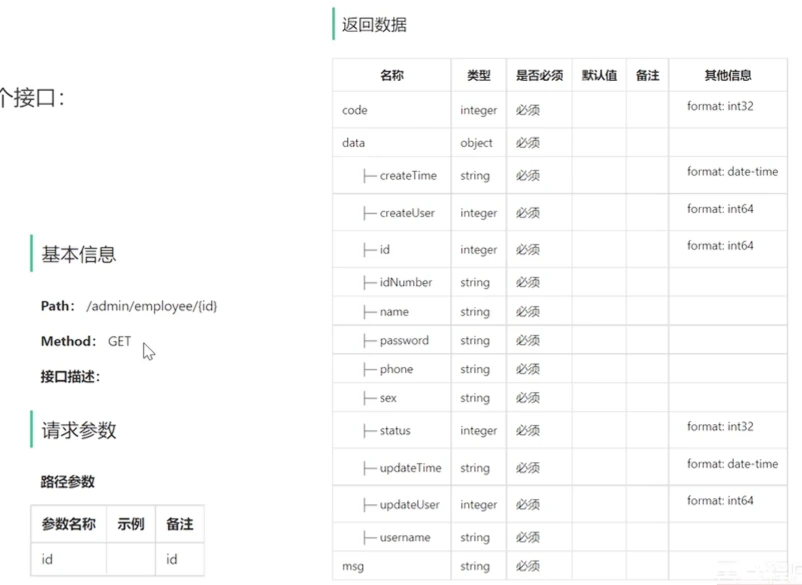
//编辑员工信息 //1.查询回显数据 @ApiOperation("回显员工信息") @GetMapping("/{id}") public Result<Employee> getById(@PathVariable Long id){ Employee employee=employeeService.getById(id); return Result.success(employee); } //2.修改员工信息 @ApiOperation("修改员工信息") @PutMapping public Result update(@RequestBody EmployeeDTO dto){ log.info("员工修改:{}",dto); employeeService.update(dto); return Result.success(); }- 路径参数前@PathVariable,
- json格式参数前@RequestBody
- 回显操作返回一个employee所以要用emp接住返回值
Service
//编辑员工信息 //1.根据id查询员工 @Override public Employee getById(Long id) { Employee employee = employeeMapper.getById(id); employee.setPassword("****"); return employee; } // 2.修改员工信息 @Override public void update(EmployeeDTO dto) { Employee employee = new Employee(); //BeanUtils拷贝属性 BeanUtils.copyProperties(dto,employee); //利用SpingMvC消息转换器进行日期转换 employee.setUpdateTime(LocalDateTime.now()); //利用threadLocal获取当前用户id //借助工具类在jwt拦截器获取id employee.setUpdateUser(BaseContext.getCurrentId()); employeeMapper.update(employee); }Mapper
<!-- 启用暂停账号--> <update id="update" parameterType="Employee"> update employee <set> <if test="name != null">name = #{name},</if> <if test="username != null">username = #{username},</if> <if test="password != null">password = #{password},</if> <if test="phone != null">phone = #{phone},</if> <if test="sex != null">sex = #{sex},</if> <if test="idNumber != null">id_number = #{idNumber},</if> <if test="updateTime != null">update_time = #{updateTime},</if> <if test="updateUser != null">update_user = #{updateUser},</if> <if test="status != null">status = #{status},</if> </set> where id = #{id} </update>修改密码
Controller
本质上是按照ID进行密码的update操作
1.基本信息:请求方式为PUT,一般修改操作规范都是PUT,也有可能和POST混着用,路径多一个/editPassword
2.请求参数:请求参数为json格式的Body体
3.返回数据:没有返回值
@Datapublic class PasswordEditDTO implements Serializable { //员工id private Long empId; //旧密码 private String oldPassword; //新密码 private String newPassword;} //修改密码 @ApiOperation("修改密码") @PutMapping("/editPassword") public Result editPassword(@RequestBody PasswordEditDTO dto) { log.info("修改密码:{}",dto); employeeService.editPassword(dto); return Result.success(); }Service
// 修改密码 @Override public void editPassword(PasswordEditDTO dto) { // 1. 设置当前登录用户 id dto.setEmpId(BaseContext.getCurrentId()); // 2. 查数据库原密码(密文) String storedPassword = employeeMapper.SelectPassword(dto); // 3. 旧密码 MD5 加密后比对,不匹配则抛异常 String oldPasswordMd5 = DigestUtils.md5DigestAsHex(dto.getOldPassword().getBytes()); if (!oldPasswordMd5.equals(storedPassword)) { throw new PasswordErrorException(MessageConstant.PASSWORD_ERROR); } // 4. 新密码加密后更新 dto.setNewPassword(DigestUtils.md5DigestAsHex(dto.getNewPassword().getBytes())); employeeMapper.editPassword(dto); }- 先输入旧密码再输入新密码,然后确认一遍新密码。这个过程中必须要求你的旧密码输入正确才可以修改。所以DTO传入的原始密码必须要和根据ID查询出来的密码一致
- 调用两个mapper接口,一个用来根据ID查密码与旧密码做匹配,一个更新密码。
- 比对后发现原始密码输入错误就抛出自定义异常PasswordEditFailedException,传入自定义常量PASSWORD_EDIT_FAILED。
- 前端传进的DTO没有值需要从threadlocal设置,密码需要进行加密
/** * 密码错误异常 */public class PasswordErrorException extends BaseException { public PasswordErrorException() { } public PasswordErrorException(String msg) { super(msg); }}
public class MessageConstant {//自定义异常提示词类 public static final String PASSWORD_ERROR = "密码错误";Mapper
//修改密码 //1.根据id查询原密码 @Select("select password from employee where id = #{empId}") String SelectPassword(PasswordEditDTO dto); //2.修改密码 @Update("update employee set password = #{newPassword} where id = #{empId}") void editPassword(PasswordEditDTO dto);新增分类
Controller
@Datapublic class CategoryDTO implements Serializable { //主键 private Long id; //类型 1 菜品分类 2 套餐分类 private Integer type; //分类名称 private String name; //排序 private Integer sort;
}@RestController@RequestMapping("/admin/category")@Api(tags = "分类相关接口")@Slf4jpublic class CategoryController {
@Autowired private CategoryService categoryService; //新增分类 @PostMapping @ApiOperation("新增分类") public Result<String> save(@RequestBody CategoryDTO categoryDTO){ log.info("新增分类:{}", categoryDTO); categoryService.save(categoryDTO); return Result.success(); }Service
public void save(CategoryDTO categoryDTO) { Category category = new Category(); //属性拷贝 BeanUtils.copyProperties(categoryDTO, category); //补充属性 //分类状态默认为禁用状态0 category.setStatus(StatusConstant.DISABLE); //设置创建时间、修改时间、创建人、修改人 category.setCreateTime(LocalDateTime.now()); category.setUpdateTime(LocalDateTime.now()); //利用threadLocal获取当前登录用户id category.setCreateUser(BaseContext.getCurrentId()); category.setUpdateUser(BaseContext.getCurrentId()); categoryMapper.insert(category); } * 状态常量,启用或者禁用 */public class StatusConstant { //启用 public static final Integer ENABLE = 1; //禁用 public static final Integer DISABLE = 0;}Mapper
/** * 插入数据 * @param category */ @Insert("insert into category(type, name, sort, status, create_time, update_time, create_user, update_user)" + " VALUES" + " (#{type}, #{name}, #{sort}, #{status}, #{createTime}, #{updateTime}, #{createUser}, #{updateUser})") void insert(Category category);支持与分享
如果这篇文章对你有帮助,欢迎分享给更多人或打赏支持!